As a photographer, you’ve been there – capturing what you think is the perfect shot, only to review your images and find them marred by unsightly dust, fingerprints, or smudges. In that case, image post-production is the only way to fix that. It’s a frustrating reality that can be easily avoided by effectively cleaning camera lenses.
The quality of your images can be greatly affected by the cleanliness of our camera lenses, and neglecting to properly clean them can even lead to permanent damage over time.
In this guide, we’ll explore the do’s and don’ts of camera lens cleaning and provide practical tips on “how to clean a camera lens” to maintain your gear and ensure optimal performance. Let’s get started:
How to clean camera lens – The do’s
Let’s begin learning how you can clean your camera lens by learning the essential techniques and best practices to follow for effective and safe camera lens cleaning:
1. Start with a lens cleaning kit
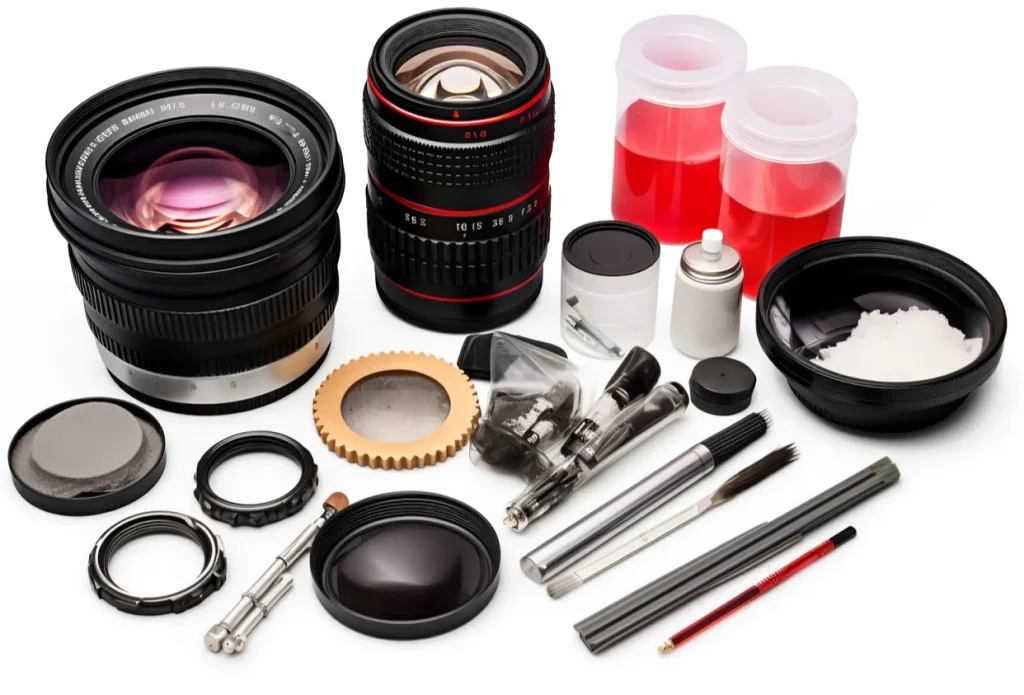
The foundation of effective camera lens cleaning is having the right tools on hand. Investing in a dedicated kit to clean camera lenses is the first thing to focus on when mastering “how to clean a camera lens.”
This type of specialized kit typically includes components such as:
- Blowing Brush/Air Blower: This tool uses a gentle air stream to safely remove dust and debris without introducing moisture or oils. It’s especially useful for removing loose particles before using your camera lens cleaning fluid and microfiber cloth.
- Lens Cleaning Brush: A soft-bristled camera lens cleaning brush is perfect for removing dust and loose particles from your camera lens. Its soft bristles won’t scratch your lens, and it’s easy to clean and maintain.
- Lens Cleaning Fluid: This mild, alcohol-based solution is specifically deposit pulsa tanpa potongan formulated to safely remove stubborn smudges and fingerprints from your lens without damaging any coatings or delicate surfaces. When choosing a camera lens cleaning fluid, select one that’s specifically designed for cleaning camera lenses and follows the manufacturer’s recommendations.
- Microfiber Cloth: Made from ultra-fine fibers, microfiber cloths are the gentlest way to wipe away dust and grime without scratching the camera lens. Look for a lint-free cloth that won’t leave behind fibers or scratches.
2. Clean in a clean environment

Before you jump into cleaning your lens, make sure to create a clean and dust-free environment. This might seem obvious, but avoiding re-contaminating your lens with dust, dirt, or other debris while cleaning a camera lens is crucial.
Here are a few tips to help you create a clean environment:
- Find a dust-free area to clean your camera lens. Avoid cleaning near fans, air vents, or open windows, as these can stir up dust and debris.
- Make sure that you remove loose clothing and accessories that can shed fibers or lint, such as loose scarves and hats.
- Cover your workspace with a clean, lint-free cloth or paper to prevent dust and debris from settling on your lens.
- Turn off any air conditioning or heating vents in the area to prevent dust and debris from circulating.
3. Use the right tools

When learning about “how to clean a camera lens,” Many beginner photographers make the mistake of using the wrong tools. Using the right tools is crucial, as different contaminants require different tools to be removed safely and effectively.
Here’s a breakdown of when to use each tool to clean the camera lens:
- Lens Cleaning Brush: Get rid of loose dust and debris with a soft-bristled lens cleaning brush. Gently sweep the brush across the lens circularly to remove any loose particles.
- Blowing Brush/Air Blower: Remove dust and debris from your lens with a blowing brush or air blower. Hold the blower at a 45-degree angle and gently blow across the camera lens to remove any loose particles. Be careful not to blow too hard, as this can introduce moisture or push debris further into the lens.
- Microfiber Cloth: Wipe your lens with a microfiber cloth to remove fingerprints, smudges, and other marks. Apply gentle pressure as you wipe the cloth across the lens in a circular motion. To avoid recontaminating the camera lens, use a clean, dry microfiber cloth.
- Lens Cleaning Fluid: Use a camera lens cleaning fluid to remove stubborn stains or marks from your lens. Apply a small amount of fluid to the microfiber cloth and gently wipe the cloth across the lens in a circular motion. Make sure to use a cleaning fluid specifically designed for cleaning camera lenses and follow the manufacturer’s instructions.
4. Clean from the center out
When cleaning your camera lens, it’s essential to clean from the center outwards to avoid spreading contaminants around the lens. This cleaning technique helps prevent streaks, scratches, and other marks that can compromise image quality.
Here’s how to clean a camera lens from the center out:
- Start by applying a small amount of lens cleaning fluid to the microfiber cloth, if necessary.
- Place the cloth in the center of the lens and gently wipe it outwards in a circular motion.
- Use gentle pressure, increasing as necessary, but don’t apply too much pressure because it might scratch the lens.
- Continue wiping outwards in a circular motion, gradually moving towards the edges of the lens.
- As you clean, inspect the lens to ensure that the contaminants are being removed. If necessary, repeat the process until the lens is clean.
Cleaning the camera lens from the center out helps to:
- Prevent streaks and marks from forming on the lens.
- Avoid spreading contaminants around the lens.
- Reduce the risk of scratching the lens.
- Ensure a thorough cleaning of the entire lens surface.
5. Clean regularly
Cleaning your camera lenses regularly is essential for keeping your camera gear in top condition. Depending on the shooting conditions and environment, such as a fashion studio or outdoor setting, you may need to clean your lens more or less frequently.
As a general guideline, cleaning your lens after each shooting session is a good idea, especially if you’ve been working in dusty or humid conditions. Despite looking clean, contaminants can slowly build up over time, causing image quality to decline.
Cleaning your lens regularly can help prevent these gradual buildups and ensure it always operates at its best.
6. Store cleaning supplies properly
To ensure the longevity and effectiveness of your lens cleaning supplies, storing them properly when not in use is important. Here are a few tips:
- Keep your microfiber clothes in a clean, dry place, such as a sealable plastic bag or container. This will prevent dust and lint from accumulating on the cloth.
- Be sure to store your lens cleaning fluid in a cool and dark place, away from direct sunlight or studio light setup. Exposure to heat or UV light can degrade the formula over time.
- Keep your blowing brush or air blower in a dust-free environment, such as a protective case or pouch. This will prevent debris from building up in the tool.
- Consider investing in a dedicated lens cleaning kit or organizer to keep all your supplies in one place and easily accessible.
7. Consider professional cleaning
While regular lens cleaning is an essential part of maintaining your camera gear, there may be times when professional cleaning is warranted. This can be particularly important for older or heavily used lenses or if you suspect more serious contaminants or damage.
Camera lens cleaning services often have specialized equipment and techniques that can get rid of stubborn stains, embedded dirt, and even minor scratches you can’t fix yourself.
They can also perform a more thorough, deep-cleaning process that can restore the lens to optimal condition.
If you notice a significant decline in image quality, persistent hazy or cloudy areas on the lens, or are simply unsure about the best course of action, it’s always a good idea to consult a professional camera repair technician.
They can assess the condition of your lens and recommend the appropriate cleaning or repair services to get your gear back in top shape.
How to clean camera lens: The don’ts
When it comes to learning “how to clean camera lenses,” photographers should be aware of common mistakes and harmful practices. Understanding the “don’ts” of lens cleaning is just as important as knowing the right techniques.
Below are some key things you should never do when cleaning your camera lens:
1. Don’t use everyday cleaning products
The most common mistake many beginner photographers make when cleaning camera lenses is using everyday household cleaners and products.
These products are not designed for the delicate coatings and surfaces of camera lenses and can cause irreparable damage.
Some common household cleaning products to steer clear of include:
- Glass cleaners: These often contain ammonia or other harsh chemicals that can strip the lens coatings and leave behind streaks or residue.
- Vinegar-based cleaners: The acidic nature of vinegar can etch and damage the lens surface over time.
- Bleach or abrasive cleaners: These strong chemicals can scratch and permanently mar the lens, compromising image quality.
- Soap and water: While seemingly harmless, regular soap and water can leave behind a film or residue that can degrade the lens performance.
Instead, it’s crucial to use specialized solutions or tools to clean camera lenses safely and effectively without damaging the lens coating.
Look for products specifically formulated for camera lenses and follow the manufacturer’s instructions carefully.
2. Don’t use tissues or paper towels
Cleaning camera lenses with paper towels or tissue paper might sound like a good idea, but they can actually do more harm than good.
Tissue and paper towel fibers can be abrasive and easily scratch the delicate lens surface.
Over time, these tiny scratches can accumulate, affecting the clarity and sharpness of your images.
Furthermore, tissues and paper towels are not designed to effectively remove contaminants like fingerprints, smudges, and dust.
Instead of leaving your lens clean, these materials can actually spread and redistribute the dirt, leaving behind streaks and residue.
3. Don’t blow on the lens
One common mistake many photographers make when cleaning their camera lenses is blowing directly on the lens surface. When you blow directly on the lens, you introduce moisture and additional contaminants that can push dirt and particles deeper into the lens elements.
Eventually, this can cause permanent damage, including water spots and smudges. Therefore, it’s much better to use a dedicated lens-cleaning tool, such as a blowing brush or air blower, instead of blowing on the lens.
4. Don’t rub too hard
Applying too much pressure to clean the camera lens is another common mistake that must be avoided. Rubbing the lens surface too hard can lead to scratches, which can permanently compromise the image quality and clarity of your photographs.
The lens surface is coated with delicate, specialized coatings that are designed to enhance optical performance and reduce glare. These coatings are susceptible to damage if subjected to excessive force or abrasion.
However, if you accidentally scratch your lens, don’t panic. Minor scratches can often be polished out with specialized lens cleaning solutions or taken to a professional for repair.
However, it’s always better to prevent scratches in the first place by being gentle and patient during the cleaning process.
5. Don’t clean while the lens is mounted
Before you begin cleaning your camera lens, it’s always best to remove the lens from the camera body. Cleaning the lens while it’s still mounted can be more challenging and increases the risk of damaging your camera or lens.
It’s much easier and safer to thoroughly clean the entire lens surface when it’s detached from the camera. This allows you to get into all the nooks and crannies to make sure you’re cleaning everything.
Also, when cleaning a mounted lens, there’s a higher risk of accidentally introducing dust, lint, or other contaminants into the camera body itself, which can lead to issues with the camera’s internal components.
To clean your camera lens properly, always start by unscrewing the lens from the camera body. This will allow you to handle the lens with more control and care without damaging the lens or the camera itself.
6. Avoid touching the lens
One of the most important rules for cleaning your camera lens is to avoid touching the lens itself. Oils from your skin, dirt, and other contaminants on your fingers can easily transfer to the lens, leaving behind streaks, marks, and other imperfections.
Here are some tips to help you avoid touching the lens:
- Handle the lens by the edges or the rim, avoiding the glass surface.
- Make sure you clean the lens with a lens cleaning cloth or tissue instead of your bare fingers.
- If you must touch the lens, ensure your hands are clean and dry. Wash your hands with soap and water, and dry them thoroughly before handling the lens.
- Avoid eating or handling foods with oils or grease before cleaning your lens, as these can transfer to the lens and leave behind stubborn stains.
- Consider wearing gloves or using a lens cleaning handle to further reduce the risk of contamination.
7. Don’t use compressed air
Many photographers make the mistake of using compressed air to clean camera lenses. The main issue with using compressed air is the potential for moisture buildup.
When you spray compressed air onto a lens, the rapid expansion of the gas can cause condensation to form on the lens surface. This moisture can then lead to water spots, streaks, and even mold or fungus growth over time.
Additionally, the high-pressure stream of air from compressed cans can potentially push contaminants deeper into the lens elements, making them even more difficult to remove.
This can ultimately compromise the image quality and performance of your camera lens.
Why cleaning your camera lens matters
Your camera lens is one of the most crucial components for capturing high-quality, sharp images. However, over time, it can become contaminated with various debris, such as dust, fingerprints, and smudges.
These contaminants can significantly impact the overall performance and image quality of your camera.
Dust and other particles on the lens surface can scatter light, leading to hazy, low-contrast images. Fingerprints and smudges can create unsightly marks and streaks, compromising the clarity and sharpness of your photographs.
In extreme cases, neglecting to clean your camera lens can even lead to permanent damage, such as scratches or etching of the delicate lens coatings.
That’s why it’s important to develop a consistent lens cleaning routine and follow the best practices outlined in this guide on “how to clean a camera lens.”
Additional tips for keeping your camera lens in top shape
In addition to following the do’s and don’ts of lens cleaning, here are a few additional tips and techniques you can use to keep your camera lenses in pristine condition:
1. Use a lens hood
One of the best ways to protect your camera lens from dust, debris, and potential damage is to use a lens hood. Lens hoods are designed to shield the lens’s front element from direct sunlight, wind, and wayward particles that could compromise image quality.
2. Store lenses properly
When not in use, it’s important to store your camera lenses in a way that prevents dust and other contaminants from accumulating on the surfaces. Always replace the front and rear lens caps when the lens is not mounted on the camera.
Additionally, consider using a dedicated camera bag or lens case to store your lenses when traveling or not in use. This will help protect the delicate coatings and prevent scratches.
3. Clean zoom and telephoto lenses carefully
Cleaning zoom and telephoto lenses requires a bit more care and attention than standard prime lenses. Due to their extended barrels and complex mechanisms, these lenses are more susceptible to dust and debris buildup.
When cleaning, be sure to gently brush away any visible dust or particles, taking care not to let any contaminants fall into the inner workings of the lens.
4. Tackle stubborn stains and scratches
It is possible to occasionally encounter stubborn stains, smudges, or even minor scratches on your camera lens. For these situations, you can use a lens cleaning solution specifically formulated to safely remove these types of blemishes.
Apply a small amount of the solution to a microfiber cloth and gently dab or wipe the affected area. Avoid scrubbing, as this can exacerbate the problem. If the issue persists, it’s best to consult a professional lens repair technician.
In conclusion
There you have it. You don’t need to be a pro to learn how to clean a camera lens. By following this easy lens cleaning guide, you can easily remove dust, fingerprints, and other contaminants from your camera lenses while avoiding mistakes that can permanently damage them.
A little bit of diligence and the right techniques will keep your camera lenses clean, clear, and ready to capture stunning photos for years to come.